Difficulty
Moderate
Steps
4
Time Required
- TinyNES Dummy Board Installation 4 steps

In Progress
This guide is currently being written. Reload periodically to see the latest changes.

Private
This guide will not appear in search results and can only be viewed by team members!
-
-
Make sure that you have both of the necessary new parts, and that they are undamaged:
-
White plastic Jumper Board Spacer.
-
Jumper Board marked with part number TD-TDMY-A and assembled with three 1x3 male pin headers.
-
The Jumper Board pictured here is green, but yours may be a different color.
-
Check to make sure that none of the Jumper Board pins are bent. If any of them are slightly bent, attempt to bend them back into position with a small pair of pliers. If any of them are damaged, please contact us for a replacement.
-
-
-
Place the TinyNES on a flat work surface. Make sure that no cables, controllers, or cartridges are connected to it.
-
Remove the 8 marked M2.5 x 10 mm flat head machine screws.
-
Put the screws aside, being careful not to lose them.
-
Lift the top panel off of the enclosure and put it aside.
-
If the white plastic cartridge guide comes off with the top panel, remove it from the top panel and reposition it around the cartridge connector.
-
-
-
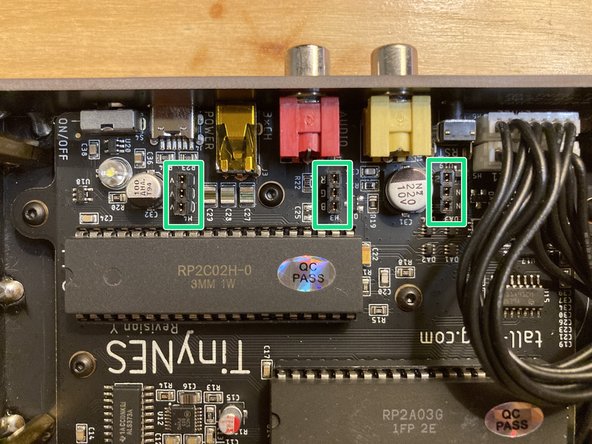
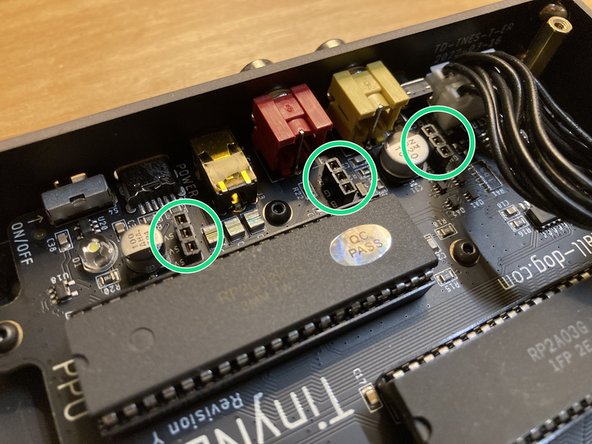
Locate the 3 marked 1x3 female sockets on the main board. These components are designated H2, H3, and H4.
-
Two different photos are shown here from varying angles in order to help you identify these 3 sockets.
-
Place the jumper board so that its pin headers align with all 3 of the sockets. Then push down to seat the jumper board fully into all 3 sockets.
-
The jumper board is not symmetrical and it will only mate with all 3 of the sockets in one orientation, as shown.
-
The white printed markings on the jumper board should be facing down and should not be visible after the board has been installed.
-
-
-
Verify that the jumper board has been seated correctly and is secure.
-